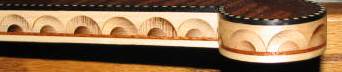
Made from solid maple and hot-sand shaded. This particular band is 3/4" wide. The lunette section is 9/16", with a 1/16 sapele and 1/8" maple stripes. It is .040" thick.
I made a few blocks of the maple (lunette segments without the sapele and maple stripe), and will make a banding with edges and width to your specifications. Similar stripes from wood of your choice may be used, and the width can be made from a minimum of 7/16" to as wide as desired. The basic width of the blocks (Lunette section) are just over 3/4" wide. So, for example, two 1/8" wide stripes for a total width of 1". The minimum width of the lunette section would be about 7/16", as the radius on the outer arc is just under 3/8". The price for each 36" piece would be about $24 with 2 stripes, and a minimum order of 6 pieces. If you need fancy stripes, such as a dentil band, the price would be higher. I am very flexible on the design, and anything is negotiable. Please call me (Matt) at 704-221-2147 to discuss options.
Shown with a clear shellac finish.

Lunette meaning lunar which refers to moon/full moon and lunar eclipse. Lunette inlay banding was used by cabinetmakers John & Thomas Seymour in the 1800s. Other furniture and cabinet makers also used this style of banding but the Seymour's probably did it best.
This banding is difficult and time-consuming to make, but the end result is worth the effort (if you have the time, tools and skills). It can be made using several different techniques; among using drills and plug cutters or routers. I used a router with a 3/8" radius core box bit for the larger arcs and a 3/16" radius bit for the smaller, inside arcs. Filler pieces were cut on the router table with 3/16" and 3/8" bullnose bits, then the pieces were hot-sand shaded before gluing into the coves. Sapele and maple stripes were added.
Shown Below - Onlayed onto the edge of this piece and bent around the curved edge. This edge is slightly under 2" in diameter. This was accomplished by soaking the banding in water for about a half-hour, then bent around the radius and clamped in place with a self-fabricated caul (shown below) .
Clamped in place with a self-fabricated caul.

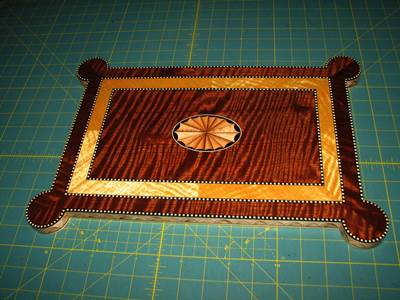
The completed top!